
Learn
Use Cases
How teams use ConversionWax
Guides
Step-by-step setup and strategy
Content Personalization Guide
How to personalize your website
Playbook
Proven plays for every industry
Compare
How we stack up against others
Blog
Personalization tips and platform updates
Help Center
Docs, setup guides, and support
Featured playbook
Ecommerce Personalization Playbook
Geo-targeted offers, BFCM windows, device-specific layouts - copy-paste plays that run themselves.
Optimized Images
Auto-resize for any device
Video Support
Personalized video content
Scheduled Updates
Time-based content automation
By role
Ecommerce Operators
Geo-offers, BFCM, device layouts
Growth Marketers
Campaign pages, UTM matching, A/B
Digital Agencies
Multi-site, version control, team access
New in the platform
AI Image Generation
Generate campaign visuals from a prompt. Saves to your asset library.
Learn more →![The Ultimate Guide to Content Personalization [2026]](/content/images/size/w2000/2025/05/The-Ultimate-Guide-to-Content-Personalization_resized.png)
The Ultimate Guide to Content Personalization [2026]
How to set up content personalization with location targeting, URL rules, A/B testing, responsive variants, and per-banner analytics. Step-by-step with real examples.
A visitor lands on your site from a Google Ads campaign targeting "summer running shoes." They see the same generic homepage banner as everyone else - a winter jacket promotion from last month. They bounce. You paid for that click, and you wasted it.
Content personalization fixes this. It replaces static, one-size-fits-all website content with targeted variants based on who is visiting, where they are, and how they got there. Not abstract "personalized experiences" - actual banner images, hero visuals, and content sections that change based on real signals like location, URL parameters, and time of day.
This guide covers how content personalization works in practice, the targeting signals that power it, and how to set it up step by step.
What Content Personalization Looks Like in Practice
Content personalization means specific elements on your website change based on visitor context. Here is what that looks like with real examples:
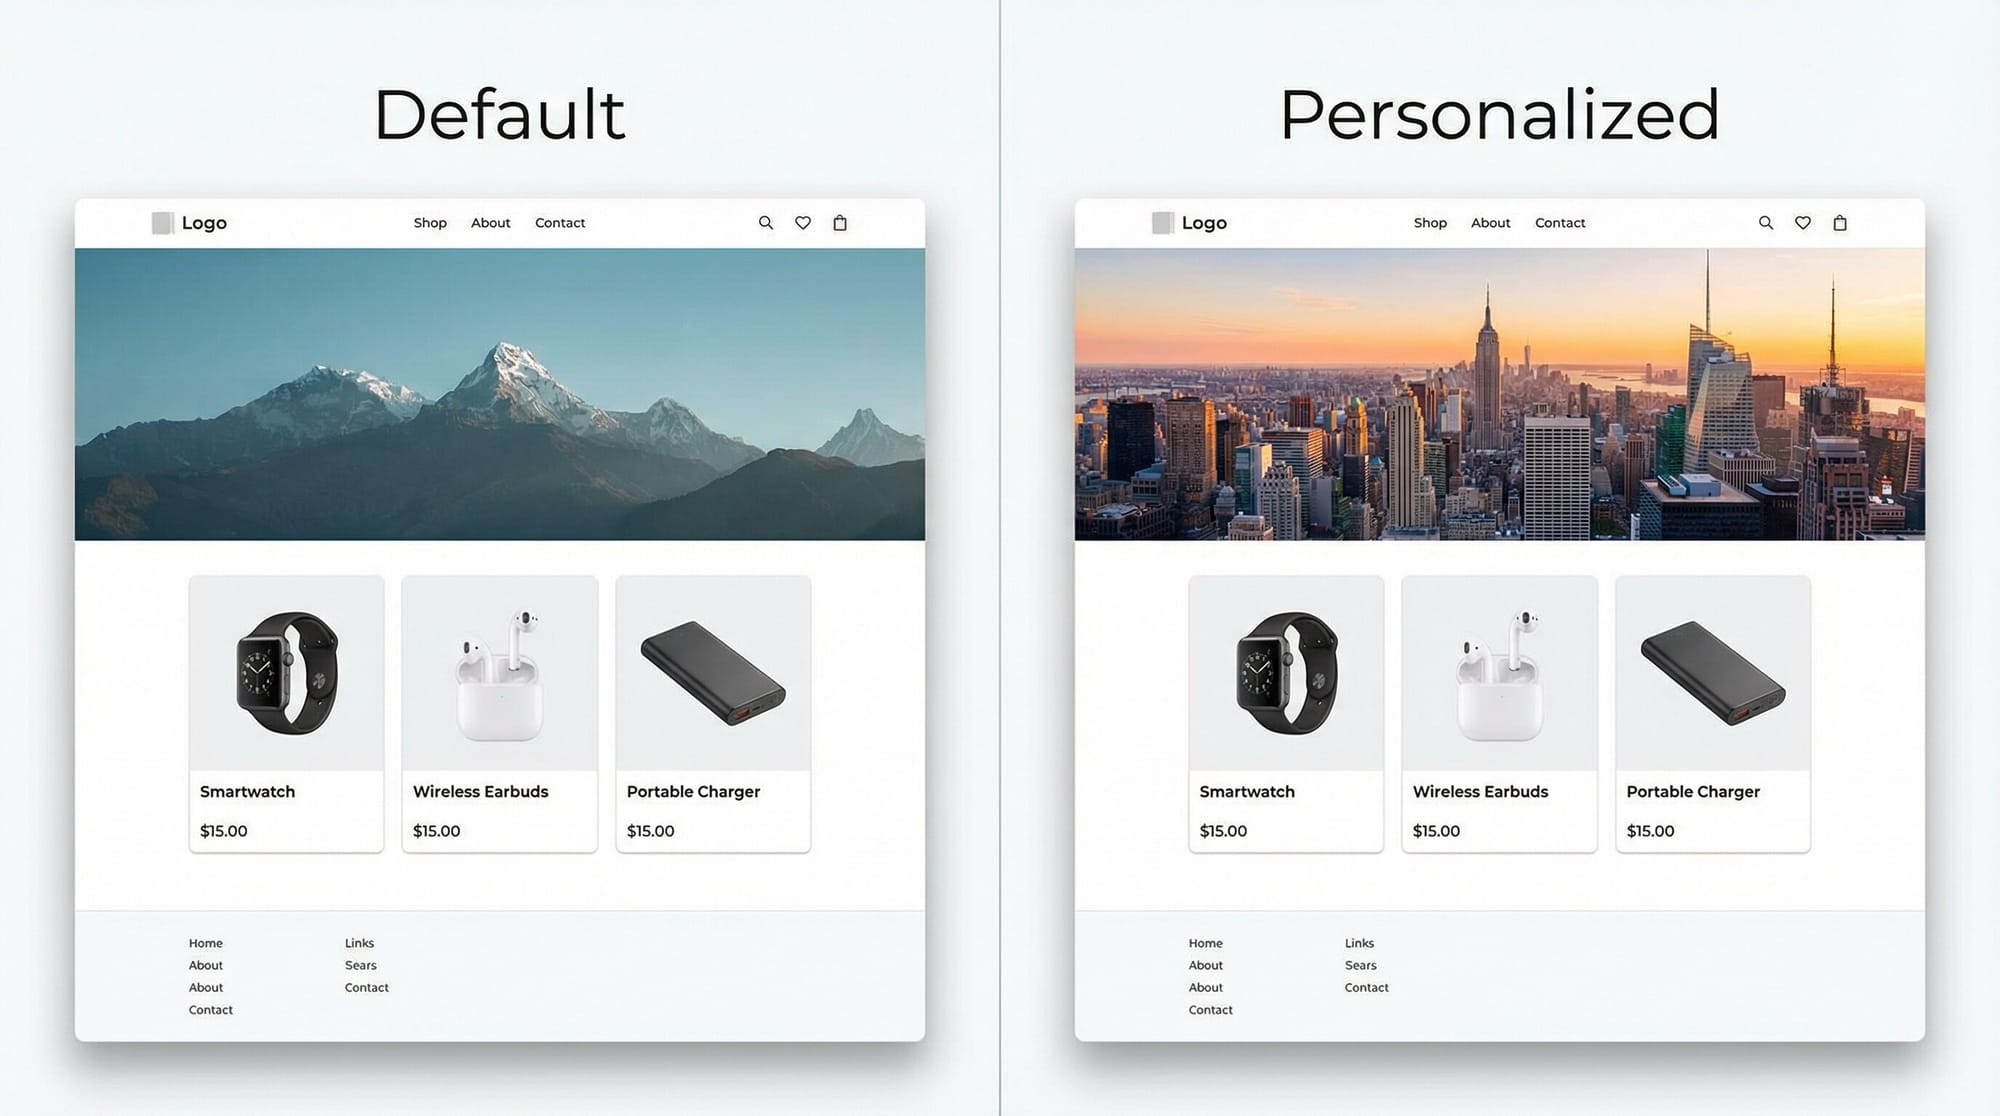
Hero banners. A travel company shows tropical beach imagery to visitors in cold-weather cities and ski resort imagery to visitors in warm-weather cities. Same page, different hero image.
Product photography. An outdoor retailer shows rain gear product photos to visitors in the Pacific Northwest and sun protection products to visitors in the Southwest. The product page layout stays identical - only the featured imagery changes.
Promotional banners. A SaaS company runs a webinar promotion. Visitors arriving from the LinkedIn ad see a banner matching the ad creative they clicked. Visitors arriving from an email campaign see a different banner matching that email's visual style.
Content sections. A multi-location restaurant chain shows the nearest location's food photography and specials. A visitor in Chicago sees the Chicago restaurant's images. A visitor in Denver sees Denver's.
Video content. A fitness brand embeds workout preview videos on its class pages. Visitors on mobile see vertical video thumbnails optimized for scrolling, while desktop visitors see horizontal previews that fill the wider viewport. The content section serves different video assets per breakpoint, not the same file scaled down.
Seasonal banners with scheduling. An ecommerce brand prepares holiday-themed hero banners weeks in advance. Using display scheduling, the Valentine's Day banner auto-activates on February 10 and auto-expires on February 15. The team sets it up once and moves on - no one needs to manually swap the creative or remember to pull it down after the promotion ends.
Each of these is a discrete content block on your site that swaps based on rules you define. No page rebuilds. No separate URLs. The same page serves different visual content depending on the visitor.
The Data Behind Content Personalization
Every personalization decision starts with a data point. The quality of that data - and how quickly you can act on it - determines whether your personalization feels helpful or intrusive. Three categories of data power most personalization systems, and understanding them helps you pick the right starting point.
Demographic data includes attributes like a visitor's location, age range, company size, or industry. You might pull this from a CRM, an enrichment tool like Clearbit, or simply from IP-based geolocation. A B2B SaaS company can show enterprise-focused case studies to visitors from Fortune 500 domains and startup-focused pricing to everyone else. Demographic data is stable - it doesn't change between sessions - which makes it a reliable foundation for personalization rules that don't need constant tuning.
Behavioral data captures what a visitor actually does: pages viewed, buttons clicked, time on site, scroll depth, items added to cart, and repeat visit patterns. This is where personalization gets specific. If someone has viewed your pricing page three times without converting, showing them a comparison guide or a limited-time offer on their next visit is a data-backed decision, not a guess. Behavioral data requires tracking infrastructure - analytics tools, session recording, or a CDP - but it produces the highest-signal personalization triggers because it reflects real intent.
Contextual data is everything about the visit itself rather than the visitor: the device viewport, time of day, referring URL, or UTM parameters attached to the link they clicked. Contextual data is available instantly on the first page load with zero prior history. That makes it the fastest path to personalization. A visitor arriving from a Facebook ad for winter jackets in Chicago can see a hero image of someone bundled up on Michigan Avenue - all from contextual signals that require no cookies, no login, and no CRM lookup.
Most effective personalization programs combine at least two of these data types. Start with contextual data because it works on anonymous first-time visitors, layer in behavioral data as you build tracking, and add demographic data when you have CRM or enrichment tools in place.
Targeting Signals That Drive Content Personalization
Personalization is only as good as the signals you use to target it. The five targeting dimensions that matter most are location, URL rules, URL variables, viewport, and time.
Location (Country, Region, City)
Location targeting lets you show different content based on where a visitor is. This works at three levels of granularity:
- Country - Show different banners for US visitors vs. UK visitors vs. Australian visitors
- Region/State - Target content to California visitors differently than Texas visitors
- City - Show city-specific imagery for visitors in New York, Los Angeles, or Chicago
A real estate company targeting multiple metros can show neighborhood-specific listing photos based on the visitor's city. A national retailer can highlight regional promotions tied to local events.
URL Rules (Page-Specific Targeting)
URL rules let you target content to specific pages or URL patterns on your site. You might show one banner on your homepage and a different banner on product category pages. Or display a promotional banner only on pages matching /sale/*.
This keeps your personalization targeted rather than blanket-applying the same content everywhere.
URL Variables (UTM Parameters and Query Strings)
This is where paid media teams get the most value. URL variable targeting reads query parameters from the URL - UTM source, UTM campaign, UTM medium, or any custom parameter - and serves content that matches.
A visitor arriving via ?utm_source=facebook&utm_campaign=summer-sale sees banners matching your Facebook summer sale creative. A visitor arriving via ?utm_source=google&utm_campaign=brand sees brand-awareness imagery instead.
This alignment between ad creative and landing page content directly improves conversion rates. The visitor sees visual continuity from click to page load.
Viewport (Desktop, Tablet, Mobile)
Viewport targeting is not just about responsive design. It is about serving genuinely different visual content per screen size.
A good personalization platform supports responsive variants with custom pixel breakpoints for Desktop, Tablet, and Mobile. You set the exact pixel width where each breakpoint triggers. A desktop visitor might see a wide landscape banner with detailed product imagery. A mobile visitor sees a vertically-oriented banner optimized for thumb-scrolling with a tighter crop on the key visual.
This goes beyond CSS resizing. You are serving different assets per viewport, not just scaling one image down.
Display Scheduling (Time-Based with Timezone Support)
Display scheduling lets you set start and end dates for when a banner appears, with timezone support for global campaigns.
Run a flash sale banner from Friday 6 PM to Sunday midnight, and have it appear at the right local time for visitors in each timezone. Launch a product announcement at 9 AM Eastern and have it automatically stop displaying after a week. Schedule seasonal promotional banners months in advance.
The visual calendar date picker makes this straightforward to configure. No cron jobs or manual publishing required.
How to Set Up Content Personalization
Here is the actual workflow for getting content personalization live on your site using ConversionWax.
Install the Embed Code
Add the ConversionWax embed code to your site. You choose the HTML element type (span, p, h1, h2, or div) and copy the snippet. It works with Shopify, WordPress, Webflow, Squarespace, BigCommerce, and custom-built sites.
One snippet per content section. Place it where you want the personalized content to appear.
Upload Your Assets
Upload the images and videos you want to use across your personalized content. ConversionWax supports PNG, JPG, GIF, WebP, MP4, WebM, and MOV files. You can upload up to 100 files at once, with a maximum of 50MB per file.
Use tags to organize assets by campaign, season, location, or any system that makes sense for your team. Tags carry the same color-coded labels across both assets and banners, so filtering stays consistent.
If you need to create new visuals, the built-in AI image generator (powered by Google Gemini) lets you generate images from text prompts in five aspect ratios and three quality tiers.
Build Banners with Responsive Variants
Create a banner for each piece of content you want to personalize. Each banner gets a name, description, and tags for organization.
The key step here: set up responsive variants. For each banner, you assign separate assets for Desktop, Tablet, and Mobile viewports. You also set custom pixel breakpoints so the right variant loads at the right screen size.
For each variant, you set:
- The image or video asset
- Alt text for accessibility
- A click URL (where the visitor goes when they click)
- Width and height dimensions
Create Content Sections
A content section is the container that holds your banners and defines how they display. You have two types:
- Slideshow - Rotates through multiple banners
- Static Banner - Shows a single banner
This is where you group related banners together into a publishable unit.
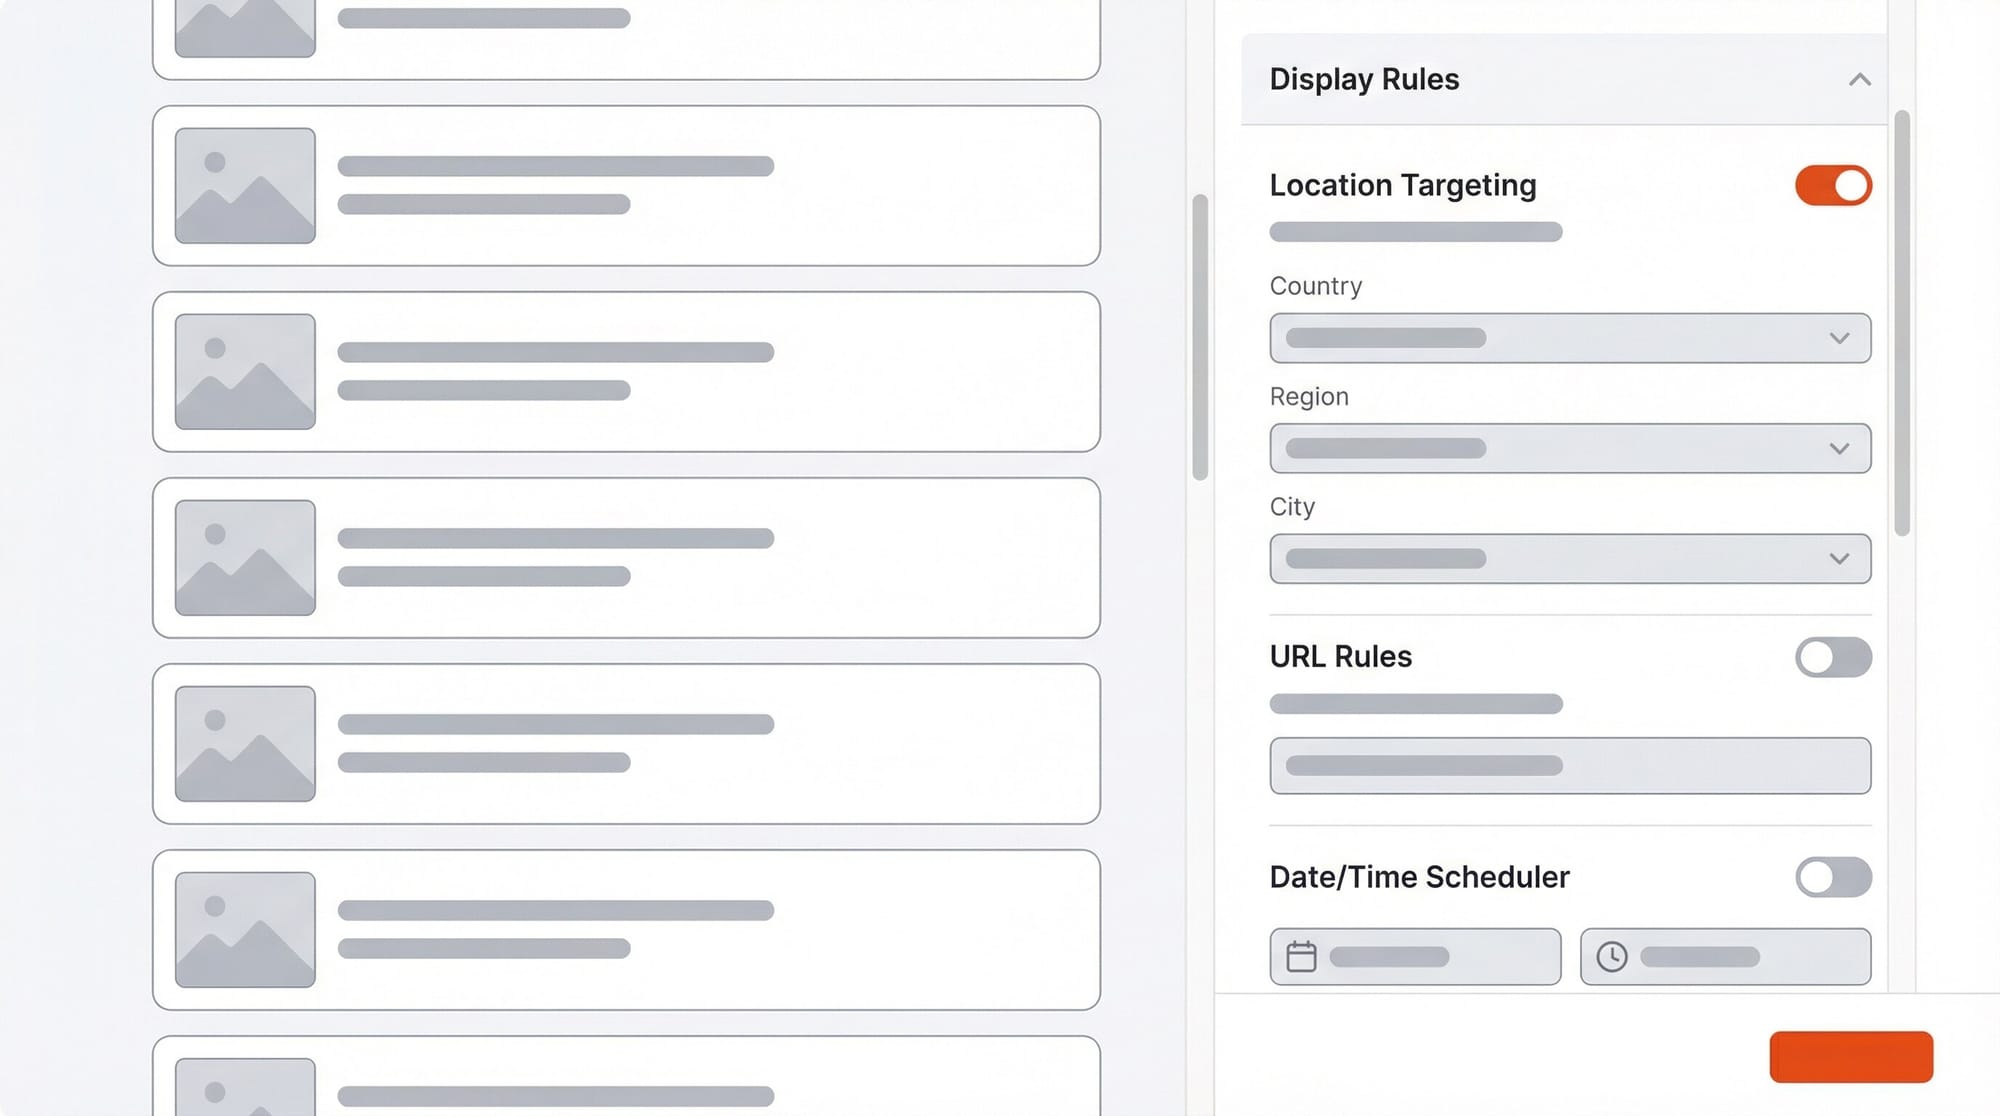
Set Display Rules
Apply targeting rules to your content section. Combine any of the five targeting dimensions:
- Set location rules for geographic targeting (country, region, or city)
- Add URL rules to target specific pages or URL patterns
- Add URL variable rules to match UTM parameters or custom query strings
- Configure viewport breakpoints for responsive variants
- Set display scheduling with start/end dates and timezone
Rules combine together, so you can target "visitors in California, arriving from a Facebook campaign, viewing on mobile, during business hours." The more specific you get, the more relevant the content.
Publish with Version Control
When your content section is ready, publish it. ConversionWax maintains a full version history for every content section. Each version can include notes describing what changed.
If something goes wrong after publishing, roll back to any previous version instantly. This version control makes it safe to iterate quickly - you always have a way back.
Building Your Content Personalization Stack
Content personalization does not happen in a single tool. It sits at the intersection of several platform categories, each handling a different part of the workflow. Here is how the stack fits together.
CMS platforms host your website and manage your pages, templates, and site structure. This is where your content lives - your homepage, product pages, landing pages. The CMS handles the base experience that every visitor sees before any personalization rules apply. Whether you run a headless CMS, a traditional platform, or an ecommerce storefront, your CMS is the foundation layer.
Customer data platforms collect and unify visitor data from multiple sources into audience profiles. They aggregate behavior from your website, email, ad platforms, and CRM into a single view of each visitor. This data feeds the targeting signals that make personalization possible - knowing that a visitor is in Dallas, arrived from a paid search campaign, and has visited three times this month.
Email marketing tools extend personalization beyond your website. When your email campaigns and website content share the same targeting logic, the visitor experience stays consistent across channels. A subscriber who receives a location-specific email should see matching imagery when they click through to your site.
Analytics platforms measure what happens after personalization rules fire. They track conversions, engagement, and revenue so you can connect personalized content to business outcomes. Without analytics, you cannot tell whether a geo-targeted banner actually outperforms the generic version.
Content personalization platforms are the execution layer. This is where you build, target, and publish personalized content sections on your website. ConversionWax handles this layer - you upload assets, define display rules based on location, URL variables, viewport, and scheduling, then publish personalized banners and content sections that swap based on visitor context. Built-in A/B testing and per-banner analytics let you measure performance without relying on external tools.
You do not need every category on day one. Most teams start with their existing CMS plus a content personalization platform and add data and analytics layers as their personalization program matures.
A/B Testing Your Personalized Content
Personalization without testing is just guessing with more variables. ConversionWax includes built-in A/B testing so you can validate that your personalized content actually outperforms alternatives.
How It Works
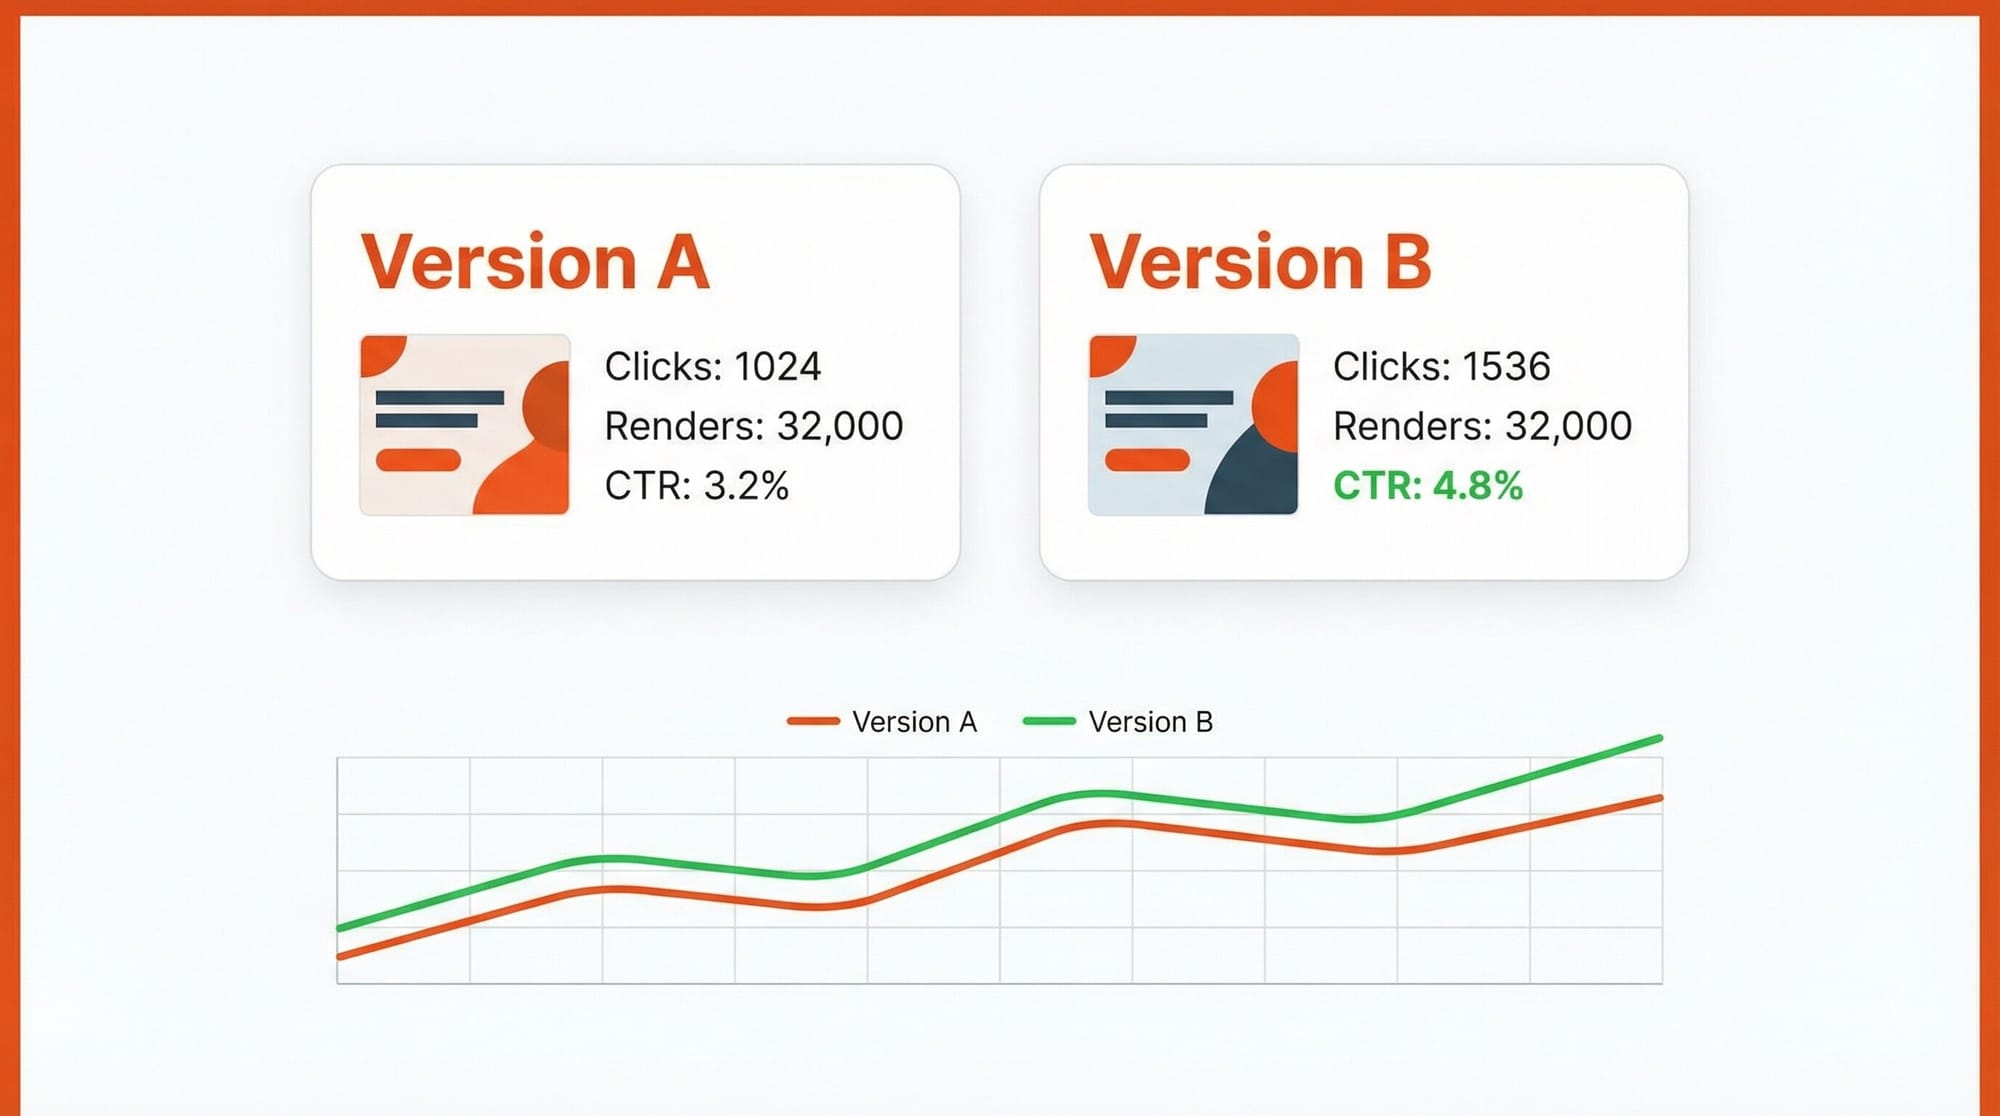
Each banner supports two complete banner sets: Version A and Version B. Both versions can have their own assets, click URLs, and responsive variants. When A/B testing is enabled, ConversionWax automatically splits traffic between the two versions.
There is no manual traffic allocation to configure. The split happens automatically, giving each version equal exposure.
What You See in the Results
A/B test analytics show side-by-side performance comparisons for Version A vs. Version B. You get per-variant metrics broken down by device type (desktop, tablet, mobile), so you can see not just which version won overall, but which version won on each viewport.
This matters because a banner that performs well on desktop might underperform on mobile. Per-device breakdowns catch that.
A/B testing is available on Growth, Professional, and Premier plans.
Measuring Personalization Performance
Every banner in ConversionWax tracks three core metrics:
Clicks
How many visitors clicked the banner
Page loads
How many times the page containing the banner was loaded
Renders
How many times the banner was actually rendered and displayed to a visitor
The distinction between page loads and renders matters. A page load counts every time the page is requested. A render only counts when the banner is actually displayed based on your targeting rules. If a banner targets only California visitors, a page load from New York will count as a page load but not a render.
Analytics Granularity by Plan
For high-traffic sites running time-sensitive campaigns, 5-minute granularity lets you catch performance changes almost in real time. For most use cases, hourly data gives you enough resolution to make informed decisions within the same day.
All plans include a custom date range picker and line charts showing metric trends over time.
Thinking About ROI
The simplest way to measure personalization ROI is to compare the click rate on a personalized banner against the click rate on your default, non-personalized version. The gap between those two numbers is your lift.
A/B testing makes this comparison rigorous. Run your personalized variant against the default as Version A vs. Version B, and let the traffic split confirm whether the difference is real. Look at the results per viewport too - a banner might drive strong engagement on desktop but underperform on mobile, which tells you where to optimize next.
Track at the campaign level. Review which targeting rules - location, UTM matching, scheduling - produce the highest render-to-click ratios. Over time, this data shows you which personalization strategies are worth scaling and which ones to retire.
Content Personalization Use Cases That Work
Here are four patterns that consistently drive measurable results.
Location-Based Banners for Multi-Location Businesses
A restaurant chain with 15 locations creates location-targeted content sections. Each section contains banners featuring that location's food photography, interior shots, and current specials. Display rules target by city.
A visitor in Austin sees the Austin location's imagery. A visitor in Portland sees Portland's. The corporate website feels local to every visitor without maintaining separate microsites.
Consider a regional pizza chain running this setup. They create 15 static banner content sections, each with city-level location rules. The Austin banner shows the Austin location's patio seating and current lunch special. The Portland banner shows Portland's beer selection and happy hour deal. Each banner uses the same page placement and responsive variants - only the imagery and click URLs differ. The team tracks renders per city to confirm each location's banner is firing correctly, and compares click-through rates across locations to identify which imagery styles drive the most engagement.
UTM-Matched Landing Page Banners for Paid Campaigns
An ecommerce brand runs paid campaigns across Google, Facebook, and email. Each channel uses different creative styles - product-focused for Google Shopping, lifestyle-focused for Facebook, deal-focused for email.
URL variable targeting matches the landing page banner to the campaign source. The visitor sees visual continuity from the ad they clicked to the page they land on. No generic hero image breaking the visual connection.
A DTC skincare brand running a summer campaign illustrates this well. They set up URL variable display rules matching utm_source and utm_campaign parameters. Traffic from their Instagram campaign sees lifestyle imagery with models using the product outdoors. Traffic from Google search sees clean product-on-white photography matching the Shopping ad. Traffic from their email newsletter sees a deal-focused banner with the discount code repeated. The team measures click-through rate per UTM source and runs A/B tests on the Instagram variant to find whether lifestyle or close-up product shots convert better.
Scheduled Promotional Banners with Timezone Support
A SaaS company runs a Black Friday promotion. They schedule the promotional banner to start displaying on Black Friday morning and stop on Cyber Monday at midnight. Timezone support ensures the promotion starts at the right local time for visitors worldwide.
After the promotion ends, the banner automatically stops displaying. No one has to remember to manually remove it on Tuesday morning.
A B2B software company with customers across North America, Europe, and Asia-Pacific sets this up using display scheduling rules with timezone targeting. The Black Friday banner activates at 6 AM local time in each visitor's timezone, so a visitor in London sees the promotion at 6 AM GMT while a visitor in San Francisco sees it at 6 AM PST. The team layers URL rules on top so the promotional banner only appears on the homepage and pricing page - not on documentation or support pages. They track renders and clicks hourly to see which timezone windows produce the highest engagement, using that data to optimize timing for their next scheduled campaign.
Responsive Variants Serving Different Images per Viewport
An online retailer's product page hero image shows a wide lifestyle shot on desktop - the product in context with surrounding detail. On mobile, the same content section serves a tight, vertically-cropped product shot that fills the screen without requiring pinch-to-zoom.
These are not the same image resized. They are different compositions chosen specifically for how people browse on each screen size.
A furniture retailer selling sofas online makes this concrete. Their desktop banner shows a wide living room scene with the sofa styled alongside decor, lamps, and a coffee table - giving the visitor context for how the piece fits into a room. The tablet variant crops tighter to the sofa with some surrounding context. The mobile variant shows a straight-on product shot filling the vertical screen. Each variant has its own click URL pointing to the appropriate product detail page. The team sets custom pixel breakpoints at 1024px for desktop and 768px for tablet, and compares click rates across viewports using the per-device analytics breakdown to see which compositions drive the most product page visits.
Beyond the Website: Other Content Personalization Channels
Website personalization is the focus of this guide, but it sits inside a broader ecosystem. Understanding how personalization works across other channels helps you build a coherent experience instead of isolated experiments.
Email Personalization
Email is where most marketers first encounter personalization - and it goes well beyond merge tags in subject lines. Modern email platforms let you swap entire content blocks based on subscriber segments, optimize send times per recipient using engagement history, and trigger sequences based on specific actions like cart abandonment or content downloads. The best email personalization feels like a one-to-one message because the content, timing, and offer all reflect what the platform knows about that subscriber. Tools like Klaviyo, Customer.io, and HubSpot handle this natively.
Product Recommendations
Ecommerce recommendation engines analyze purchase history, browsing patterns, and similar-customer behavior to surface products a visitor is most likely to buy. Collaborative filtering ("customers who bought X also bought Y") is the most common approach, but newer systems factor in margin, inventory levels, and seasonal trends. Amazon's recommendation engine drives over 35% of its revenue. Shopify apps like Rebuy and Nosto bring similar capabilities to smaller stores.
Retargeting
Retargeting closes the loop between your website and paid advertising. When a visitor views a specific product page or category without converting, retargeting platforms like Meta Ads and Google Display Network can show them ads featuring those exact products. The personalization happens in ad creative selection - the system picks images and copy based on what the visitor already engaged with. This only works well when your website tracking captures granular behavior, which is another reason to invest in on-site personalization infrastructure first.
In-App Personalization
For SaaS and mobile apps, personalization shows up in onboarding flows, feature discovery prompts, and usage-based upsells. A project management tool might surface different onboarding steps for a marketing team versus an engineering team based on their signup responses. Tools like Pendo, Appcues, and Chameleon handle in-app personalization without requiring engineering resources for each variation. The principles are identical to website personalization - match the experience to the visitor's context - but the data signals skew toward product usage rather than marketing behavior.
AI and Machine Learning in Content Personalization
Predictive personalization uses machine learning models trained on historical conversion data to decide which content variant a specific visitor is most likely to respond to. Instead of you writing rules like "show variant A to visitors from California," the model analyzes hundreds of signals and picks the best-performing variant for each visitor profile automatically. Platforms like Dynamic Yield and Monetate have offered this for years at enterprise price points, but the underlying approach is becoming accessible to smaller tools as well. The catch: predictive models need volume. If your site gets fewer than 10,000 monthly sessions, rule-based personalization will outperform ML because the model won't have enough data to learn from.
AI-generated content variants are the newer development. Instead of a designer creating five hero image variants for five audience segments, generative AI can produce those variants from a single prompt or base image. On the text side, large language models can draft subject line variations, product descriptions tuned to different buyer personas, or landing page copy matched to specific campaign angles. On the visual side, image generation models can adapt backgrounds, swap seasonal elements, or create location-specific imagery at scale. ConversionWax integrates Google Gemini for AI image generation, letting you produce image variants for different personalization rules directly inside the platform rather than round-tripping through a separate design tool. It is one practical application of a broader trend - not a silver bullet, but a meaningful time saver when you need twenty image variants instead of three.
Real-time decisioning combines both of these capabilities into systems that adapt mid-session. A visitor lands on your homepage and sees a default hero image. They click through to a product category, spend 40 seconds reading specs, and return to the homepage - which now shows a hero image featuring that product category. This in-session adaptation requires sub-second decision-making and fast asset delivery. Most implementations rely on edge computing or client-side JavaScript to avoid round-trips to a server. The practical takeaway: if you are evaluating personalization tools, ask how they handle in-session behavior changes, not just pre-defined segment rules.
Privacy and Compliance
GDPR in Europe and CCPA in California set the floor for how personalization platforms can collect and use visitor data. The short version for marketers: if you are using cookies or tracking scripts that identify individual visitors, you need explicit consent before those tools fire. That means cookie consent banners, clear privacy policies explaining what data you collect, and a mechanism for visitors to opt out or request deletion. Non-compliance penalties are real - GDPR fines can reach 4% of annual global revenue. The practical impact is that any personalization relying on third-party cookies or cross-site tracking is becoming harder to execute as browsers phase out third-party cookies and consent rates for tracking hover around 40-60% in most markets.
First-party data - information collected directly from your own website visitors - is the path forward. This includes on-site behavior, form submissions, purchase history, and contextual signals like viewport size, time zone, and IP-based geolocation. ConversionWax is built around this model: it executes entirely client-side using JavaScript, does not store personally identifiable information, and uses IP-based geolocation that resolves to city-level location without tracking individual users across sites. No cookies are required for location, viewport, UTM, or time-based personalization rules. That means your personalization keeps working at full capacity regardless of cookie consent status - a significant practical advantage as the privacy landscape tightens. If your personalization strategy depends on third-party data or cross-site tracking, now is the time to rebuild it around first-party and contextual signals.
Frequently Asked Questions
What is content personalization?
Content personalization is the practice of displaying different website content to different visitors based on contextual signals. Instead of showing the same static page to everyone, personalization rules swap banners, hero images, and content sections based on factors like the visitor's location, the URL parameters they arrived with, their viewport size, or the current date and time.
How does content personalization differ from customization?
Personalization is automated and data-driven - the system detects visitor context and serves the right content variant without the visitor doing anything. Customization is user-initiated, where the visitor manually selects preferences or toggles settings. A visitor seeing a geo-targeted banner is personalization. A visitor choosing "show me products in my area" from a dropdown is customization.
Do I need a developer to set up content personalization?
No. ConversionWax works by pasting an embed code into your site, which most marketing teams can do without developer help. The banner builder, display rules, and scheduling are all configured through a visual interface. If you can edit a page in your CMS, you can set up personalized content.
Does content personalization affect SEO?
ConversionWax runs client-side, which means search engine crawlers see your default content - the same base page you would serve without personalization. Personalized variants only load in real browsers after the JavaScript executes. Your indexed content, page titles, and meta descriptions remain unchanged.
How do I measure content personalization ROI?
Start by comparing click rates on personalized banners against your default (non-personalized) baseline. Use A/B testing to isolate the lift - run the personalized variant as Version A and the generic version as Version B. ConversionWax tracks clicks, page loads, and renders per banner, giving you the data to calculate engagement differences at the campaign and targeting-rule level.
What types of content can be personalized?
ConversionWax personalizes visual content: hero banners, product photography, promotional banners, content sections, slideshows, static banners, and video. Each content section supports responsive variants for desktop, tablet, and mobile viewports, so you can serve different assets per screen size.
How quickly can I launch personalized content?
Most teams go live within an hour of signing up. The workflow is: paste the embed code, upload your image or video assets, create a banner with responsive variants, set your display rules, and publish. There is no staging environment to configure or deployment pipeline to run through.
Can I personalize content for specific ad campaigns?
Yes. URL variable targeting reads UTM parameters and custom query strings from the visitor's URL. You set display rules that match specific parameter values - like utm_source=facebook or utm_campaign=spring-sale - and ConversionWax serves the banner that matches. This lets you align landing page visuals with the ad creative that brought the visitor to your site.
What data do I need to start personalizing content?
You can start with zero historical data by using contextual signals that are available on every page load: visitor location via IP geolocation, viewport size, time of day, and UTM parameters from your campaign links. These require no cookies, no CRM integration, and no prior visit history. As you scale, adding behavioral data from analytics tools and demographic data from your CRM or enrichment platforms lets you build more targeted segments. But the fastest path to results is starting with contextual personalization rules that work on 100% of your traffic from day one.
Is content personalization worth it for small websites?
Yes, but the approach matters. Sites with fewer than 5,000 monthly sessions should avoid complex multivariate testing or ML-driven personalization because the data volume is too low for statistical significance. Instead, focus on high-impact, rule-based personalization: show location-relevant imagery to visitors from your top three markets, match landing page visuals to your paid campaign creative using UTM parameters, or swap hero images by viewport size so mobile visitors see vertically oriented visuals. These rules don't need large sample sizes to work - they apply a known best practice to every qualifying visitor immediately.
How does content personalization affect page load speed?
It depends entirely on the implementation. Server-side personalization adds processing time before the page loads, typically 50-200ms depending on the complexity of the decisioning logic. Client-side personalization loads the default page first, then swaps content via JavaScript, which can cause a visible flash of original content if not handled carefully. ConversionWax uses a lightweight client-side script that preloads personalized images and swaps them before the browser paints them to the screen, avoiding layout shift. When evaluating any personalization tool, test your Core Web Vitals (LCP, CLS, INP) before and after implementation to confirm there is no measurable performance regression.
What industries benefit most from content personalization?
Ecommerce sees the most immediate ROI because personalized product imagery and location-based promotions directly influence purchase decisions - typical conversion lifts range from 8% to 35%. Travel and hospitality benefit heavily from location-based visual personalization, showing destination imagery that contrasts with a visitor's current climate. SaaS companies use personalization to match landing pages to specific campaign audiences, improving ad spend efficiency. Real estate, financial services, and media companies also see strong results. The common factor is not industry but traffic volume and audience diversity: if your visitors come from multiple segments with meaningfully different needs, personalization will outperform a one-size-fits-all page.
Go Deeper: Content Personalization by Topic
- Content Personalization Examples - 12 real-world scenarios across ecommerce, SaaS, travel, and restaurants
- Content Personalization Strategy - Step-by-step plan from audit to measurement
- Content Personalization for Ecommerce - Location-based imagery, campaign matching, and seasonal scheduling for online stores
- Email vs Website Content Personalization - Which channel to prioritize and how they work together
- Content Personalization Tools - 8 tools compared across website, email, and CDP categories
Getting Started
ConversionWax offers a 14-day free trial on all paid plans. No credit card required. The trial includes the full feature set of whichever plan you choose, so you can test display rules, A/B testing, and analytics at full resolution before committing.
Install the embed code, upload a few assets, set your first display rules, and publish a personalized content section.