
The complete guide
Website Personalization
What it is, why it works, and where to start.
Learn
Use Cases
How teams use ConversionWax
Guides
Step-by-step setup and strategy
Content Personalization Guide
How to personalize your website
Playbook
Proven plays for every industry
Compare
How we stack up against others
Blog
Personalization tips and platform updates
Help Center
Docs, setup guides, and support
Featured playbook
Ecommerce Personalization Playbook
Geo-targeted offers, BFCM windows, device-specific layouts - copy-paste plays that run themselves.
Optimized Images
Auto-resize for any device
Video Support
Personalized video content
Scheduled Updates
Time-based content automation
By role
Ecommerce Operators
Geo-offers, BFCM, device layouts
Growth Marketers
Campaign pages, UTM matching, A/B
Digital Agencies
Multi-site, version control, team access
New in the platform
AI Image Generation
Generate campaign visuals from a prompt. Saves to your asset library.
Learn more →Real-time personalization hub
Real-Time Website Personalization
One embed across every platform. Geo, UTM, viewport, and schedule rules render in milliseconds.
Platforms
WordPress
Plugin · WordPress.org
Shopify
Real-time personalization
Adobe Commerce
Plugin · Magento personalization
Contentful
Headless CMS personalization
Joomla
Real-time personalization
Sanity
Headless CMS personalization
Native plugins
On WordPress.org
ConversionWax for WordPress
Official plugin: shortcode-based banners, A/B testing, and AI image generation. Defer-loaded, Core Web Vitals friendly.
Get the plugin →Help docs
ConversionWax for Adobe Commerce
Plugin for Adobe Commerce and Magento Open Source. Setup guide and configuration steps.
Read the docs →Asset imports
Just released
Canva → ConversionWax
Import banner designs and hero images from Canva directly into your ConversionWax asset library. Skip the export-upload cycle.
See how it works →Anywhere else
One embed code
If your site can accept a script, ConversionWax works on it. WooCommerce, Webflow, BigCommerce, Squarespace, custom builds.
See setup →WordPress Personalization
Show every visitor the right hero image, headline, and offer. Without a dev ticket, a page builder migration, or a theme rewrite.
Free in the WordPress.org plugin directory · Works with Elementor, Divi, Beaver Builder, and Gutenberg · No theme file edits

What is WordPress personalization?
WordPress personalization is the practice of changing what a visitor sees on a WordPress page based on signals like their location, the campaign that sent them, the device they're on, or the time of day. Instead of one static page for every visitor, the page adapts in real time so different people see different versions.
On WordPress specifically, personalization runs into three layers most platforms don't have: the theme files that control rendering, the plugin ecosystem that may already be modifying your output, and caching plugins that decide which version of the page each visitor receives. The right approach handles all three without forcing a rewrite of any of them.
Why WordPress personalization is harder than it should be
The promise is simple. The reality on WordPress sites is rarely simple. Three things tend to break first.
Most plugins hook into your theme
If a personalization plugin modifies template files, switching themes (or updating the active one) breaks every rule you set. Your variants stop showing. Your targeting rules silently fail.
Caching plugins serve the wrong version
WP Rocket, W3 Total Cache, LiteSpeed Cache, and similar plugins cache the rendered HTML. If personalization runs server-side, the first visitor's variant gets cached and served to everyone after them. Cache poisoning is the most common WordPress personalization bug.
Page builders use different content models
Elementor, Divi, Beaver Builder, and Gutenberg each store content differently. Personalization logic written for one builder doesn't transfer to another. If you change builders later, you start over.
How to personalize a WordPress site: four methods
There are four real approaches. Each has tradeoffs. Pick the one that matches the change frequency, who manages the rules, and how your site is cached.
Method 1: Native WordPress conditionals
WordPress ships with conditional tags like is_user_logged_in(), is_category(), and custom field checks. You can wrap content in PHP conditionals to show different things to different visitors. Works for the basics. Limited to what WordPress already knows about the visitor (login state, role, post taxonomy). No location, no campaign source, no device targeting without writing it yourself.
Method 2: Logic-based plugins
Plugins like If-So and Logic Hop let you build conditions inside the post editor. Pick a trigger (location, referrer, day of week), choose what to show, save the post. Good for occasional personalization on a handful of pages. The condition syntax lives inside your post content, so editors need to learn it. Performance depends on whether the plugin runs server-side or client-side.
Method 3: Visual personalization scripts
Scripts like ConversionWax run client-side after the page loads. You add a single script tag (via plugin or in your header), then manage all rules in a separate dashboard. Caching plugins can't poison the variant because the swap happens in the browser, not on the server. Works the same regardless of which builder or theme you use, because it targets the rendered DOM, not the source content.
Method 4: Custom development
Write the personalization logic directly in your theme or a custom plugin. Maximum flexibility. Maximum fragility. Every change requires a deploy. Every theme update risks breaking it. Only worth it for sites with very specific requirements that none of the above methods can meet.
At a glance
Best for: simple role or category-based content swaps inside theme files.
Best for: occasional in-post personalization managed by editors who can learn condition syntax.
Best for: site-wide personalization that survives theme changes, caching plugins, and page builder swaps.
Best for: requirements no off-the-shelf option can meet, with a dev team to maintain it.
What you can personalize
Four signals cover most use cases. Each can run on its own or stack with the others.
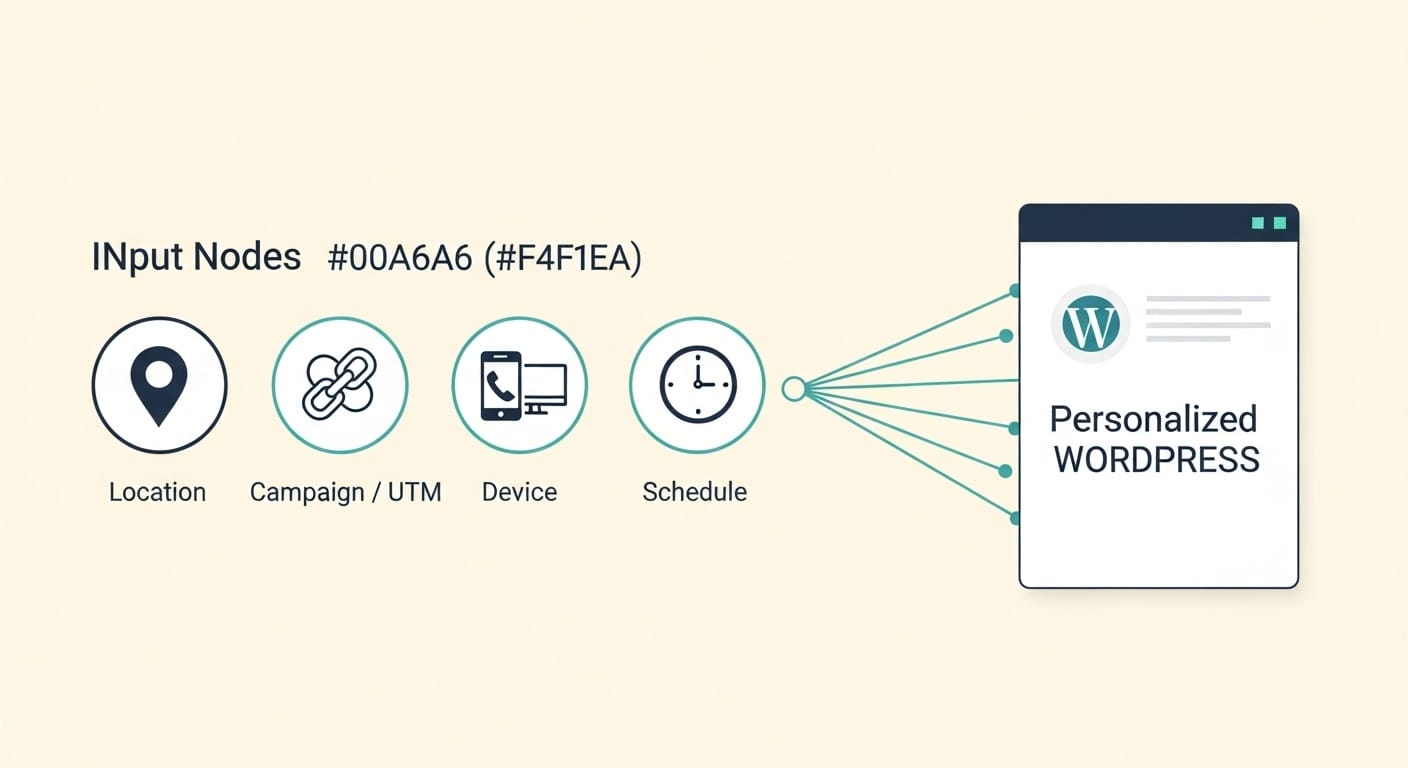
By location (geotargeting)
Detect the visitor's country, region, or city from their IP address and serve content matched to that location. A visitor in London sees London pricing in pounds and a UK shipping banner. A visitor in Sydney sees the same page with AUD pricing and Australia-only delivery copy.
By campaign (UTM and URL parameters)
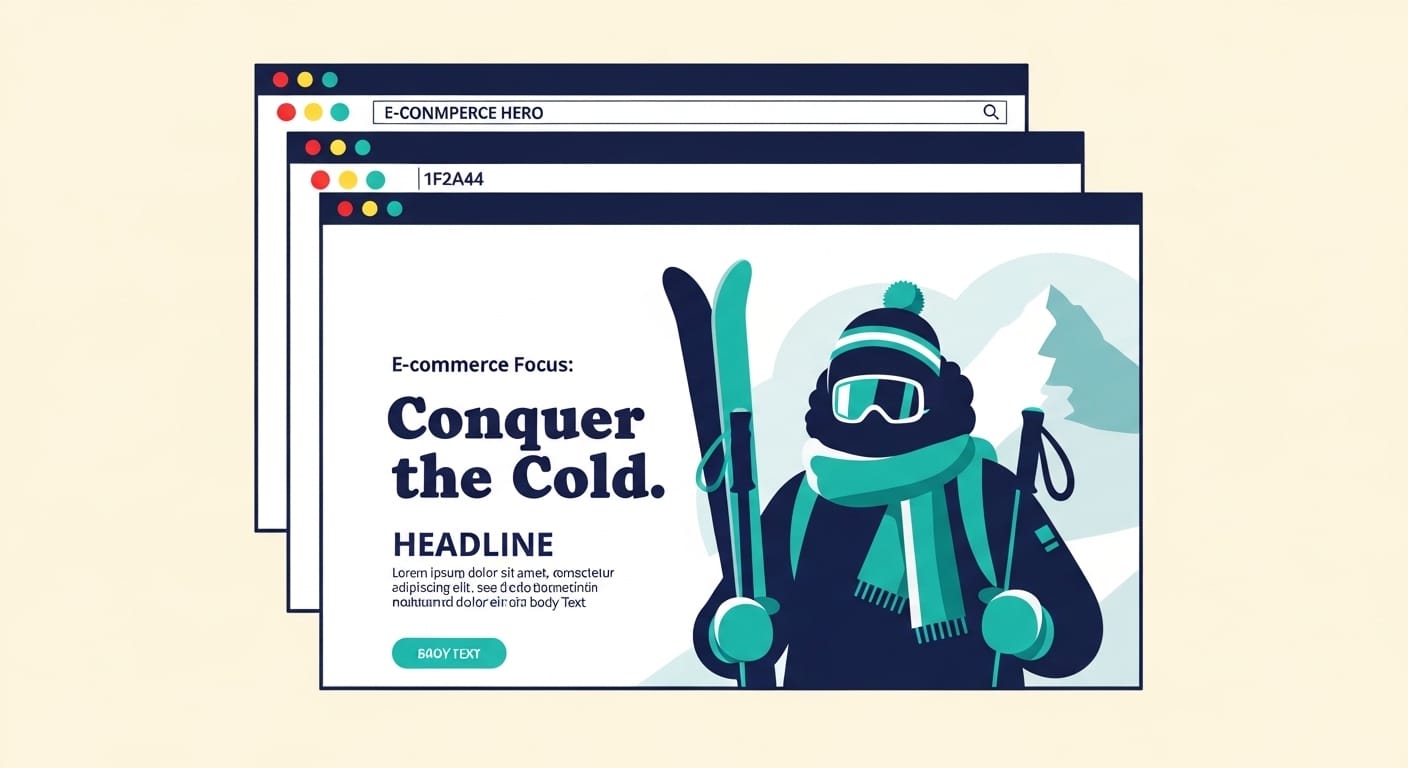
Read UTM parameters or any URL variable the visitor arrived with. A click on a Google Ad for "winter coats" lands on a page where the hero image, headline, and product carousel all match the search intent. Same URL, different render based on the parameters.
By device
Serve a vertical hero image at 640x400 to phone visitors and a wide landscape banner at 1440x600 to desktop visitors. Same WordPress page, different image asset chosen at render time. No separate mobile theme. No duplicated pages.
By time and schedule
Set a banner to appear at midnight on 28 November and disappear at 11:59pm on 2 December. The schedule honors the visitor's timezone or yours, your choice. Holiday campaigns, flash sales, and timed product launches publish themselves without anyone touching the keyboard at the cutover.
WordPress-specific considerations
This is the section that catches people out. Anything that touches WordPress has to coexist with what's already running on the site.
Caching plugins
If you run WP Rocket, W3 Total Cache, LiteSpeed Cache, or any other full-page cache, server-side personalization will poison your cache. The first visitor's variant gets stored and served to everyone after. ConversionWax runs entirely client-side, so the cached HTML stays generic and the personalization happens in the browser after the page loads. No exclusion rules to maintain.
Page builders
Elementor, Divi, Beaver Builder, and Gutenberg all render different markup. ConversionWax targets the rendered DOM elements (by selector), not the builder's underlying content model, so the same rule works across all four. If you migrate from Elementor to Gutenberg, your rules keep working as long as the new layout has the elements you targeted.
Hosts
WP Engine, Kinsta, Cloudways, SiteGround, and self-hosted WordPress all behave the same. ConversionWax is a script the browser loads, not a server-side integration, so there are no host-level conflicts. No firewall exceptions to request, no PHP version requirements.
Themes
Astra, GeneratePress, Kadence, Blocksy, Hello Elementor, or any other theme works. No theme file edits. No functions.php changes. The plugin adds the script tag for you and the personalization runs against whatever HTML your theme outputs.
The ConversionWax WordPress plugin
ConversionWax ships as a free plugin in the WordPress.org directory. Install it, activate it, paste your account key, and you're done.
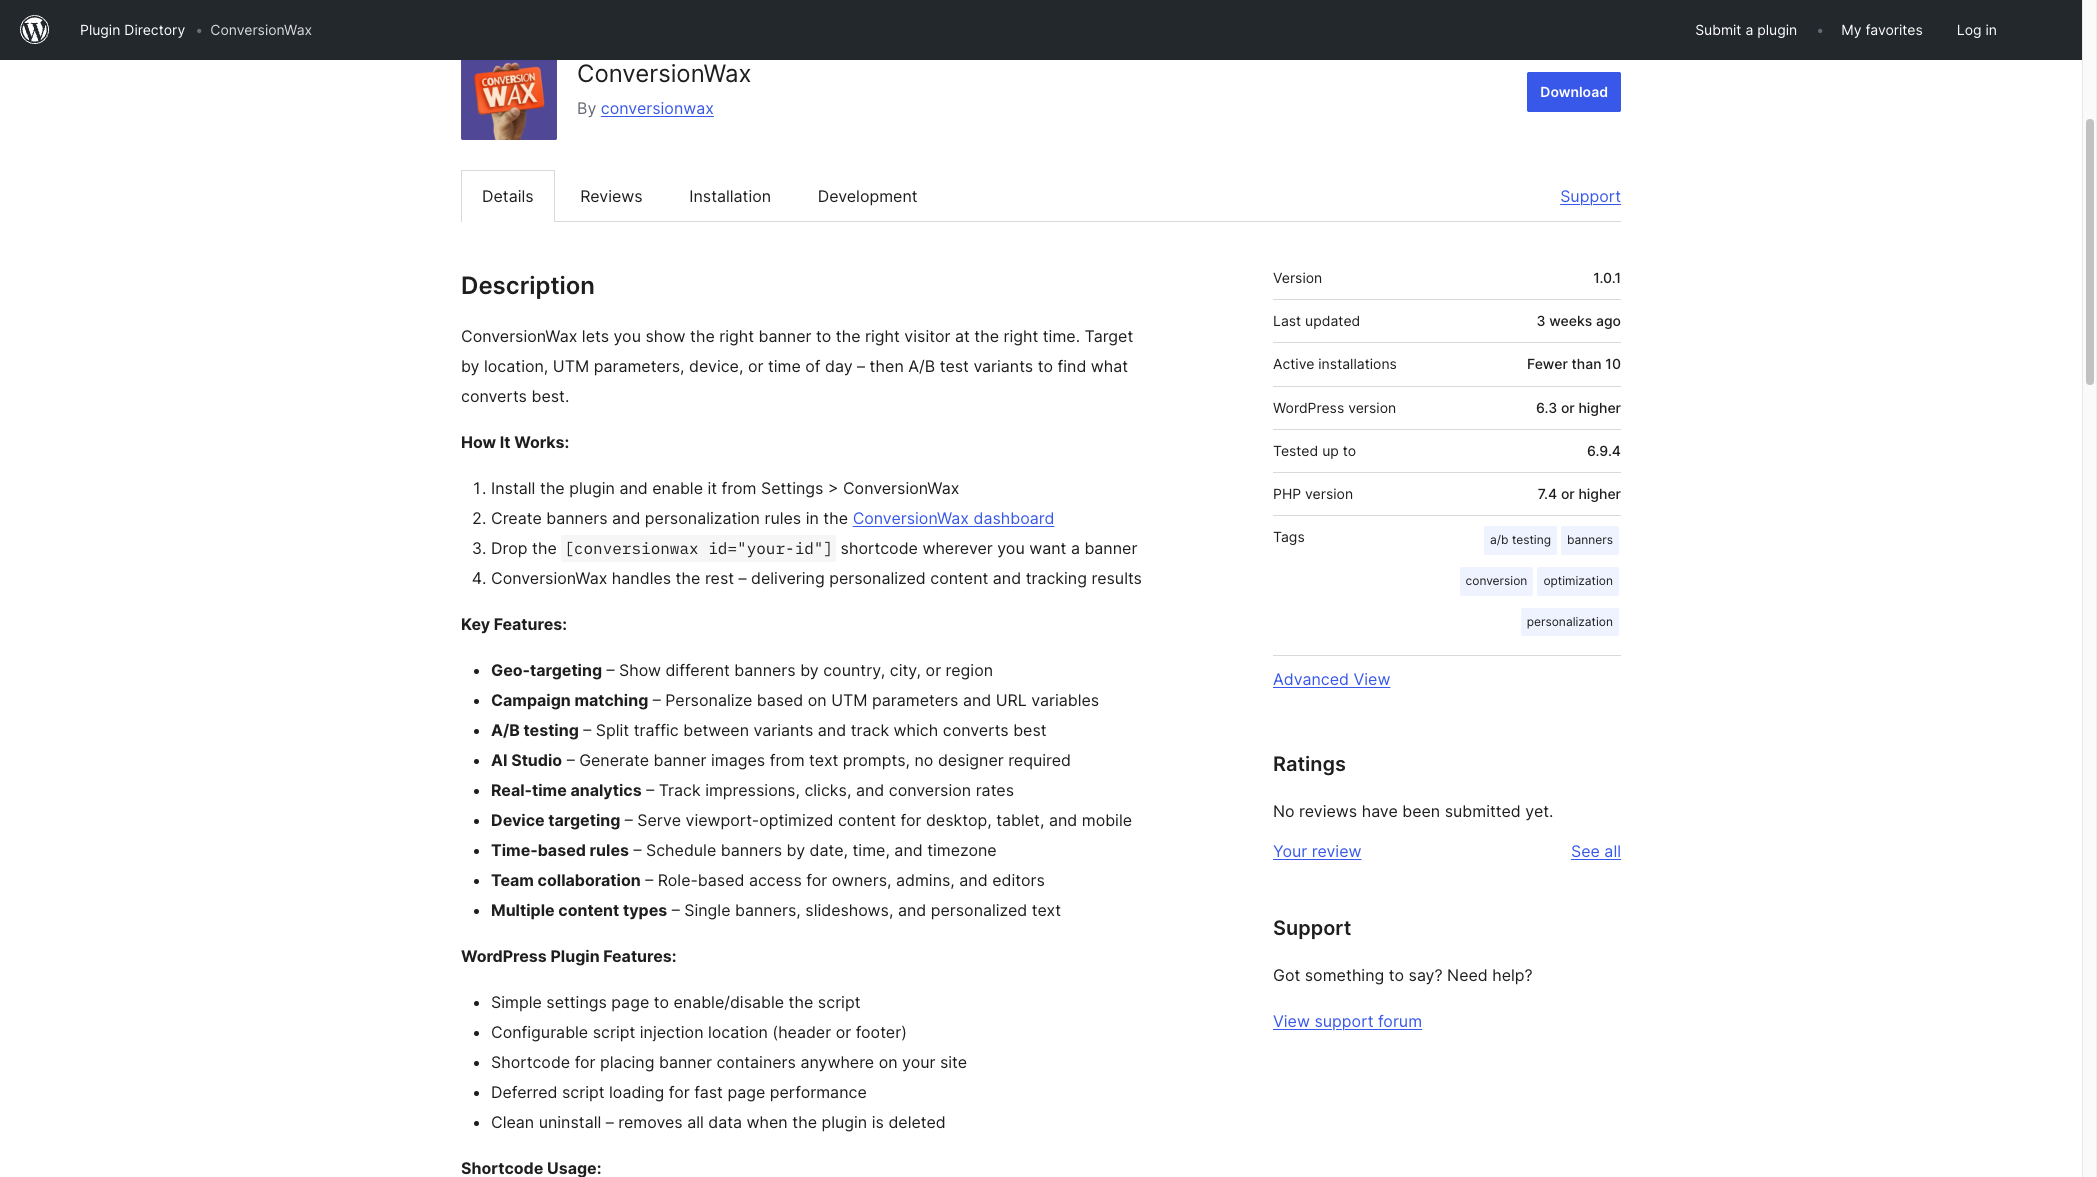
What the plugin does
It loads the ConversionWax script with the right account ID and exposes a shortcode ([conversionwax id="your-id"]) for placing banner containers anywhere in your content. That's it. No template edits, no functions.php, no shortcode hunting in old posts.
Where rules live
Targeting rules and content variants live in the ConversionWax dashboard, not inside WP-Admin. Your content team can manage personalization without needing WordPress logins, which matters for agencies and marketing teams who don't want every contributor in the WP backend.
Multisite
Works on WordPress multisite. Each site can use its own account or share a single account across the network.
Three WordPress personalization examples
Example 1: Location-matched hero for a multi-city service business
A multi-location service company runs a single WordPress homepage. ConversionWax detects each visitor's city and swaps the hero image to a recognizable local landmark. The headline updates to mention the city by name. Lead-form intake routes to the nearest office automatically. Same page URL, same template, different content per visitor city.
Example 2: UTM-matched landing page for Google Ads
A landing page reads the utm_term parameter from a paid search click and writes the matched keyword into the H1. A click on the ad for "ecommerce personalization software" lands on a page with that exact phrase in the headline. A click for "wordpress personalization plugin" lands on the same URL with that phrase instead. Quality Score improves because ad copy and landing page match.
Example 3: Black Friday banner schedule on a WooCommerce store
A WooCommerce store sets a Black Friday banner to publish at midnight on 28 November and retire at 2 December 11:59pm. The schedule lives in ConversionWax. The store team configures it weeks ahead and goes home for the holiday weekend. Banner appears, runs through the campaign, retires itself, and the page goes back to its default. Hours of weekend work avoided.
Setup in four steps
Install
Connect
Configure
Publish
Install the plugin
Search "ConversionWax" in your WordPress Plugins screen. Install. Activate. Or install the ZIP from wordpress.org/plugins/conversionwax.
Connect your ConversionWax account
Paste your account ID into the plugin settings page. The script tag is added to your site's header automatically. No theme edits, no functions.php.
Upload variants and set targeting rules
In the ConversionWax dashboard, upload your image, video, or text variants. Pick the targeting signals (location, campaign, device, schedule) and the conditions for each variant.
Publish
Hit publish in the dashboard. Rules go live on your WordPress site immediately. No deploy, no cache flush required (the personalization is client-side).
Frequently asked questions
Does ConversionWax work with my WordPress theme?
Yes. The plugin is theme-independent. It targets rendered DOM elements, so it works with Astra, GeneratePress, Kadence, Blocksy, Hello Elementor, custom themes, or any other.
Does it work with Elementor, Divi, or Beaver Builder?
Yes to all three, plus Gutenberg. ConversionWax targets the final rendered HTML, not the builder's content model, so the same rules work regardless of which builder you use.
Will personalization slow down my site?
The script is loaded with deferred execution and weighs under 20 KB. Variant swaps happen in milliseconds with no layout shift. Lighthouse performance scores are typically unaffected.
Do I need a developer to install it?
No. Installation is a standard WordPress plugin install, then a single account ID paste. Marketing or content teams can do this without developer help.
Does it conflict with WP Rocket or W3 Total Cache?
No. Personalization runs client-side after the cached HTML loads, so the cache stays generic and the variant is chosen in the browser. No exclusion rules needed in your caching plugin.
Can I A/B test hero images?
Yes. Set two or more image variants for the same target and ConversionWax splits traffic and tracks engagement. Winning variant can be promoted manually or automatically.
Does it work on WooCommerce?
Yes. WooCommerce stores personalize hero banners, product photos, promotional callouts, and category headers the same way any other WordPress site does.
Is there a free plan?
Yes for evaluation: a 14-day free trial with full features, no credit card required. Paid plans start at $99/month with 250,000 pageviews included; pageview-based add-ons start at +$75/month for 500K extras and scale up to +$1,555/month for 20 million.
Related resources
Keep going with related guides, features, and the plugin itself.
Personalize your WordPress site this afternoon
Install the plugin, set your first rule, and watch the variants go live. 14-day free trial with full features, no credit card. Paid plans start at $99/month + pageview add-ons.